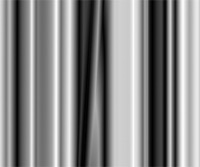
- Create a new RGB image of your desired size with a background color of white.
- Select the Gradient tool with foreground/background colors of black/white, choose the linear gradient and set the Mode to Difference.
- Using short horizontal (or nearly horizontal) strokes, work from left to right across the image area. Continue to work across the image from left to right. You should build up vaguely fold-like shading patterns.
- When you get to the far right of the image, repeat the process (still working on the same layer), but this time working from right to left back across the image. Then when you get to the far left of the image you can start moving from left to right again. Basically, keep going until it looks "right".
Sepia (and other) toning
Start with B/W RGB image. Adjust hue/saturation sliders to whatever color (hue) and intensity (saturation) you like. Sepia is hue value 23. A blue cast (value 233) is also nice.
DuoTone
Start with B/W RGB image. Change to grayscale then to duotone. Choose colors from duotone options box that appears.
Sandwiched Image
Sandwiching involves printing two images onto one piece of paper.
- Use images in RGB mode. Choose two photos, one of a subject (person, object, landscape) and one abstract photo (texture, pattern).
- Place the images on two layers.
- Adjust the layer mode and opacity of the top layer to show the layer beneath.
Solarization
Exposure of photographic paper to light during development process. Begin with B/W image with good contrast in grayscale mode. Improve effect by brightening midtones (Dodge tool, range: midtones, exposure 50%) and deepening shadows (Burn tool, range: shadows, exposure 50%) of image before solarizing.
- Apply effect: Filter > Stylize > Solarize.
- Adjust with Filter > Fade
- Tweak tonal range with levels.
Color Corrections
Apply levels to each channel to improve tonal range, get good crisp whites and blacks.
Exposure Correction: Simulating Neutral Density Filters
For over- and under-exposed pictures.
- Select over-exposed area, feather selection slightly for better blending. Copy and paste to a new layer. Set layer mode of new layer to multiply. This adds density and saturation to over-exposed area. Reduce intensity of effect by lowering opacity of layer. Save selection.
- Select under-exposed areas, feather selection, copy and paste to new layer. For this layer, set layer mode to screen, which brightens pixels. Save selection.
- Apply curves, levels or brightness/contrast to each layer until you are satisfied. If you prefer, flatten image, then load each saved selection to work with that area.
Quick Collage
Choose pictures and place in separate layers. Apply layer mask to topmost layer. Fill makt with a black/white gradient, keeping in mind that white preserves the current layer and black reveals the underlayer.
Correcting Vertical Distortions
- If possible, start with a picture slightly bigger than the final will be.
- Drag vertical guides onto the images
- Select All
- Use Edit>Transform, and either perspective or distort control. Click one of the corners and drag it in or out to correct the distortion.
- Crop to remove revealed background.
An Impressionist Effect
- Open RGB image, select all, copy to clipboard
- Change mode to Lab Color
- Make copy of Lightness channel
- Decrease contrast of new channel (-60)
- Select Lightness channel, Filter>Stylize>Find Edges or Glowing Edges
- Add Noise to Lightness channel
- Load the duplicated low contrast channel as a selection
- Go to original picture in Layers tab
- Choose Edit>Paste Into
Line Drawings
- Choose Filter > Blur > Smart Blur. Set Quality to 'High' and Mode to 'Edge Only.' Set Radius to 2 and Threshold to 50. Check preview window and adjust as necessary for nice clean lines.
- Invert image for black lines on white background.
- Blur lines by a few pixels and duplicate it if more definition is needed.
Black & Whites from Color - Method 1
These steps will show you how to take a color photograph and turn it into black and white - it's more than just changing the mode and gives some good results.
- Open your photo in Photoshop
- Select "Calculations" from the Image menu
- For Source 1, choose the Green channel
- For Source 2 choose the Red channel
- For the Blending Mode, choose Soft Light
- In the Result drop-down box, select New Document
- Make sure you have the preview box checked to see the results
Black & Whites from Color - Method 2
You'll make several black and whites, and then choose the one you like best.
- Make three duplicates of the original; name them Red, Blue, and Green
- Desaturate the original, then Adjust Levels so all tonal values are included.
- For each of the rest, go to Image >> Adjustments >> Channel Mixer. Output the Red, Blue or Green channel and click Monochrome box. Adjust Levels so all tonal values are included.
- Compare the four results.
- Done!
Black & Whites from Color - Method 3
- Image >> Adjustments >> Channel Mixer. Start each of the channels at 50%, then tweak up or down until you are happy with the result. Compare with a duplicate that you've desaturated -- it's much better!